I am sorry that I haven't been on here much lately. My goal was to post new "how to draw" sessions at least twice a week. Unfortunately, after my drawing session at the City of Ontario Library, I got really sick. I have been recovering for the last several weeks, and still have not had much energy to draw or blog. So for the time being, I am delaying any other posts until I feel better. If you read my posts, please check back here in a couple of weeks.
Friday, June 22, 2012
Sunday, May 27, 2012
Drawing R2-D2
I think this one was a little ambitious for me to teach kids to draw, but I know the children who remained to keep learning how to draw enjoyed learning how to draw this spunky little droid. It is not as easy as it looks. And, once again, this one I drew is by freehand. I will draw a cleaner version sometime later and hopefully put this one to rest. Here are also some more pictures from the drawing workshop held on Tuesday, May 22.
 Thanks to my friend Will, who took these pictures of me.
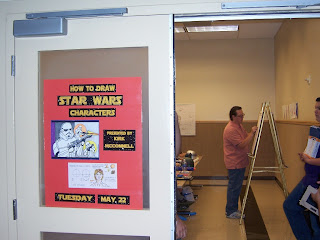 I like this picture of the poster at the door and me over by the easel. I think everyone seemed to get what I was saying. Communicating your ideas is important. As a artist, you communicate with pictures. If you cannot do this, then something is wrong. One thing I felt it important to do was check for understanding and make sure people were following along. Everyone who drew or tried to draw were at different levels of experience and ability. I thought all of the drawings were great. There were some really strong artists in this group. I tried to help as many as I could in small ways at least to let them know where important changes ought to be paid attention in each person's drawing.

If you like a good challenge, this drawing lesson will be for you. Whatever you do, stay positive, believe that you can do it, and keep drawing. You can do this if you believe you can.
Until next time....keep drawing.
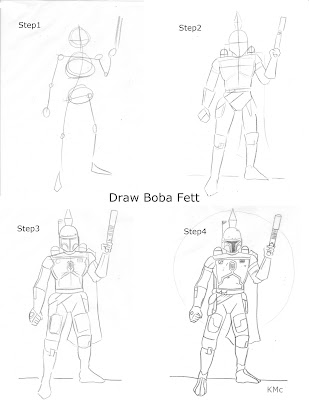
As a bonus, try drawing this picture of Boba Fett that I have added.
Enjoy!


Here, I have put R2-D2 into four steps. Begin with drawing your basic lines. Steps One and Two are almost the same. Where it becomes difficult is to remember all of the lines that go on the cylindrical figure of this little android's body. The lines should actually curve and not be straight, unless you are drawing a flat, 2D drawing. This drawing uses curved lines and features. Although, I know that I draw well, this piece is pretty ambitious. But if you take time to look at pictures and different angles, I know that you will be able to draw a really good picture of this great character. Shapes to remember when drawing this picture are a sphere, and a cylinder, and a trapezoid. What other shapes can you use to make your drawing work for you?
Until next time....keep drawing.

As a bonus, try drawing this picture of Boba Fett that I have added.
Enjoy!
How to Draw Darth Vader's Helmet
Welcome back. In this session, I have tried to keep the steps to drawing very simple, but I will provide some explanation for each step so you can draw more easily. I am also going to post some pictures from my time providing this how to draw lesson...at least one or two. I will include more when I post the how to draw lesson for R2-D2.


Now on to the tutorial....

(You can click on the image to view larger)
 The dashed lines you see are guidelines. I should probably mention this. As you draw your picture it is important to draw lightly, because it will be important to erase some of the dash lines, as well as to make your drawing cleaner. It is also important to keep a good drawing eraser handy. Not that you will make a whole lot of mistakes, but it is critical to present your best quality of work when you want to show off your super skills. Draw lightly so you don't have to work hard at erasing, and don't worry too much about mistakes. They happen to the best of us.
In Step 2, you will want to observe how their are lines coming down from the side of Darth Vader's helmet. I think if the lines went beyond the helmet, they would eventually meet to form a triangular tip. At the base of the helmet, I was guessing here of the length, is the bottom part of the helmet, formed by a curved line. Also notice that the bottom half of the circle is now dashed, and will likely be erased soon. you can do that after you complete the third step.
In Step 3, Notice how Darth Vader's helmet is starting to take shape? Remember to use your guide lines to create the round letter "m" shape to connect with the sides of the helmet. When I am teaching kids to draw, I usually will share how it is often useful to recognize letters and numbers as shapes to incorporate into the picture they are making. Can you see any other shapes, letters or numbers that will help you draw this picture better?
In Step 4, more details become apparent, and any dashed lines can now be erased. What shapes do you recognize filling in the form of Vader's mask? When you have connected your lines as shown, then proceed to Step 5. When I drew this picture, I was working from memory. It is probably a good idea to look at the details from a movie clip, a statue or action figure. Some of the kids at the workshop even had an actual mask. Looking at a reference object will help you with incorporating more details and achieve a better likeness. The final process in Step 6 is to color in the picture. I left out any light source as this was not a focus for the lesson. But, if you notice in pictures, there are often spots on Darth Vader where light is shining off of the glossiness of his helm.
I hope you have enjoyed this lesson. If you have any questions, don't hesitate to send me a message. I will be glad to help you with your question.
Saturday, May 26, 2012
An update
This entry will not have any images. However, I will have some new images to post this weekend. I was really sick this week. I am not sure what it was, but it left me feeling miserable. Also, I had to teach a workshop this week at the Ontario City Library for their Star Wars evening event. It was pretty exciting. I had a good turnout of kids to learn how to draw. I taught the children (and some adults) how to draw Darth Vader's helmet and R2-D2. I will post the tutorial on here as I mentioned.
Today was Star Wars Day at the Biane Library at Victoria Gardens in Rancho Cucamonga. In spite of a cool and windy day, it was a good turnout. I was supposed to do an art duel, but ended up cancelling out at the last minute because I was not feeling well. I just wish I knew what was happening with me? On a more positive note, I contributed 50-60 b/w copies of a picture of Yoda I had drawn. I guess they put them up at the children's reference desk. I also donated some copies of other drawings I had done as prizes for the kids who were in the costume contest.
I had the opportunity to meet voice actress, Anna Graves. She was a sweet lady. She signed my copy of Star Wars Insider, and we had a brief conversation. To say the least, I liked her. I gave her a copy of my Yoda drawing too. She said she would take a picture with it and post it on Face book later. How cool is that?
So, as I am writing this, I have not forgotten you my friends. I will have pictures on here. I am sorry for having been absent.
Tuesday, May 8, 2012
How to Draw a Faerie
This is the last of the handouts I made for my Manga workshop that was held last week at the Victoria Gardens in Rancho Cucamonga, California. I am overly critical of the way I draw sometimes, but I think this was one of the drawings I liked most. I will be posting more manga as well as other how to draw items on my blog very soon.
Enjoy.

How to draw a Manga Boy's face.
Drawing every day seems to be coming more natural for me. Sometimes when you are getting back into a routine after having been out for a while, it can be a little awkward. That is why it is important to draw something every day. In my first workshop, teaching kids how to draw Manga, it was important for me to let the kids know that drawing every day for a certain amount of time is critical for becoming a better artist. Like a pianist who plays piano really well, their ability to play well did not happen over night. Some times as artists we have to work hard at doing well. I think if I did not work hard at drawing sometimes, I would begin to worry that something might be wrong with me. So, my point is, to be a good artist you need to practice drawing regularly, but have fun drawing.
Here are two samples I gave to the kids after the workshop on May 4th at the Biane Library at Victoria Gardens: They are very basic, and rudimentary, but served the purpose of having something for the children to have a reference to learn drawing. I am happy with them. I may come back and revise these in the near future with a more shot-by-shot approach.

Here is the second drawing I gave as a handout to the participants of the Asian and Pacific Islander Heritage night:

Here are some pictures I have drawn in the manga style and are from my own personal art:


I hope that you have enjoyed this little how to draw session. I know that it is very basic right now. I am learning the ins and outs of creating a good blog, so stay tuned. Until next time, keep drawing.
How to draw a manga girl's face
Hi. This is entry is about learning to draw a girl's face, specifically from Manga. Recently I taught a workshop for an Asian and Pacific Islander Heritage Night at the Biane Library located in the Victoria Gardens. My message to the children was simple and that was to have a good attitude about drawing, using one's imagination, believing one can do something and to know one has to start somewhere when he or she draws. So here is one of four drawings I did as a handout for the kids at the end of the workshop. Overall, I felt the time was well spent and a huge success.
(You can click on any picture to see a larger image)

 This is a elf mother and child I drew. I have manipulated it some in a photo program that I frequently use. My original is in color, but I liked the monochromatic feel with this drawing.
 This is an elf princess. In the how to draw books it looks slightly different, but i managed to tweek it to look the way that I want. I think it is okay to imitate someone's art if you are learning to draw or just want to be inspired as a fan. It is said that "imitation is the highest form of flattery." But, there also comes a time when you have to break away from imitating others and yourself develop your own ideas.
I had been out of touch with the art world for a while, so for me, looking at books has helped me reacquaint myself to basic techniques and principles of drawing. It is a good way to get reconnected.

This is also another elf princess with a little critter. She was simple to draw. One thing I mentioned in my workshop was to use basic shapes, letters and numbers to create a picture. I also mentioned how it is important to pay attention to details. Sometimes the fewer details makes it easier to draw. This picture would be at a beginner-easy level.
Thank you for taking time to read my blog, and learning how to draw. I hope you have enjoyed your visit. Please come back for more lessons and see pictures posted. Until next time....
(You can click on any picture to see a larger image)

Also, here are some samples of other pieces I drew based on Christopher Hart, a popular children's artist of how to draw books, but with a twist:


This is also another elf princess with a little critter. She was simple to draw. One thing I mentioned in my workshop was to use basic shapes, letters and numbers to create a picture. I also mentioned how it is important to pay attention to details. Sometimes the fewer details makes it easier to draw. This picture would be at a beginner-easy level.
Thank you for taking time to read my blog, and learning how to draw. I hope you have enjoyed your visit. Please come back for more lessons and see pictures posted. Until next time....
Monday, April 30, 2012
How to Draw: Boba Fett


Step Zero:
In this step you need to draw out your basic pose. First create your action line. That is the line that goes down the center showing you the direction of motion. Remember to draw really lightly. I used colored pencils to show the different steps. Some comic book artists use a non-photo blue pencil to sketch their layout, then pencil in the drawing with a mechanical pencil or a 2B pencil. We will cover that more another time.

Step 1
In this step use your basic shapes to fill out the stick figure you have drawn. what shapes do you see shown here? Remember to keep your drawing simple, and avoid drawing very hard with your pencil. You will need to erase your lines later after you ink your drawing. In this picture I worked from the top down to the toes.

Step 2
Here you will likely need to look at an action figure or a photograph. I will admit, I was pretty loose with my details, but I have drawn it as close as I am able to getting Boba Fett's likeness. For some strange reason, he has been one of my favorite anti-heroes ever since I was a young boy.

Step 3
You are getting close to being finished. How does your picture look? Are you satisfied? That is important. You are the one who has to be happy with your drawing. Don't worry too much about what others think. Notice that I added a circular shape in the background so as to bring Boba Fett forward to the foreground. It gives the illusion that he is actually up close. How you draw your lines is completely up to you. As I drew this I tried to keep a medium weight line. This is the point where you start adding final details, erasing lines, correcting lines, looking at how your light source will look with shadow, and writing down what colors to use for your drawing.

Here is your drawing in black and white. The picture on the left is not great. I copied this before I was finished but you can see that the picture is more detailed and ready to color. You have another option too, and you could leave it as black and white and color it grey using different values of black and white. This is known as a monochromatic scale. -just a little FYI.
Here is where I am my own critic, but since this is a how to draw session and not a pageant, I am not going to worry about small mistakes. By now you ought to have a basic idea of how to draw Boba Fett. One good thing about drawing characters is there is almost always an opportunity to make a better picture, to improve on what you drew previous. I will likely make another picture of this, and will post my improvements here as an extended feature.
I hope you have enjoyed this lesson. Please let me know what you think. Make sure you sign your drawing.
Until next time, keep drawing.
Wednesday, April 18, 2012
How to Draw a Girl's Face

Step 1 Start by lightly drawing a circle as shown in #1, then creating a basic center line. (I drew from right to left on this one, not sure why, it is what it is.)
Step 2 Draw the face portion as shown and the ear. If you were to trace your fingers across your face you would find that the ear is at a distance between the eyebrow and the base of the noses. To accent the ear you can use a lower case "h", an "S" or a "5". Use whatever you are comfortable using.
(click on a picture to see larger image.)
(click on a picture to see larger image.)

Step 3 Place guide marks as shown where the eyes,eyebrows, nose and mouth will go.
Step 4 Begin to fill in the facial elements such as the eyebrows, lips and nose. Notice that you can sort of draw an upside down number "7" to make the nose. How does your drawing look now? I hope you are doing well.
Step 5 Finish your drawing by adding hair the way you want it to look. In this cartoon, I sort of drew it quickly. It's not my best, but you get the idea, right? On the hair, I drew lines for shadow on the cartoon girl's hair. There is more that can be done, but this is the basic of basic of "how to draw" for this picture.
I hope your drawing turns out well. I will draw an updated version of this picture and share with you in the near future.
Until next time, keep drawing.
Saturday, April 14, 2012
How to Draw Faces: Luke Skywalker
 |
| Promotional Drawing-How to Draw Luke Skywalker by Kirk McConnell, 2012 |
This is from my first promotional poster I did for the City of Ontario Library, California. It is a basic layout of drawing the face. In this case I had selected Luke Skywalker from his early years before he became a Jedi.
On this basic layout, the person who would like to learn how to draw Luke will first have to understand the basic composition of the head. Having looked at other art books, most if not all, use a circle with a simple cross-hair formation to begin the structure of the face (See step 1).
During this process remember to draw lightly. It is important to do this so you can erase your pencil marks later. In step 2, I have added some more lines. When drawing the face it is very important to see and understand the distance of the eyes, nose, mouth and ears. Even the hair requires a little bit of attention. No worries, though, I will definitely have more "how to draw faces" samples for practice and future lessons. This one is just a sample.
I noted on the picture that one can draw realistically or in a cartoon manner. I tend to draw more cartoon like in my pictures, but I also possess a thorough knowledge and experience drawing portraits in pastels, charcoal, and other mediums. One way to become good at drawing faces is to practice drawing your own face while looking in the mirror. As you draw, you will begin to familiarize yourself with your own facial geometry and have a better understanding of how something ought to look.
Another way to practice is by looking at pictures in magazines and trying to copy them realistically. This can take some time, and occasionally be frustrating, but rewarding when you complete a drawing you know you made. I look forward to sharing more about how to draw pictures step-by-step with you.
Until next time, keep drawing.
Friday, April 13, 2012
How to Draw a "Clone Trooper"
I have wanted to have a "how to draw" blog for sometime. I cannot say that all of my drawings will be perfect. But my desire is to make the drawings step-by-step with enough clarity that anyone who wants to learn how to draw will not be afraid to learn how to draw. It is my hope that you will become more confident as you practice drawing each day and grow in the knowledge you will acquire. (Click on the picture to see larger.)
Sometimes when you draw, you have to learn how to "see" and not just look. One thing that is very important when you draw is being able to see shapes in relation to the lines and other elements that go into composing a picture. The drawing below is a very basic step-by-step. At the time I made this picture, I was looking at an issue of Star Wars Insider magazine, and examining how the "Clone Trooper" looked from the animated series. I attempted to keep the image looking as close as possible to the original. When you draw a likeness, it is important to remember details. Yet, do not get so caught up in every single detail that you get discouraged and stop drawing. I know my character drawing for this picture is good, but it could be better, and I will tell you this, as I improve, I will post my improvements too. Even good artists make mistakes. Do not be afraid to make mistakes. Sometimes that is how one learns.
As you try to draw from this image, take your time. Draw lightly. Be sure to erase your pencil marks after you ink your picture. It is your choice to leave it as-is, or color the drawing. Good luck as you begin learning to draw.

Subscribe to:
Posts (Atom)